QUICKSCAN IOS
KNOWLEDGE DATABASE
Check out the latest features inside v2.1.24.0103.
(Don't have this version yet? Contact your dealer for the updated software version.)
Online cloud portal NOW AVAILABLE! Easily partner with your Lab to send cases.
See "How to Send Files" tab for instructions.
Ever made the error of scanning the wrong arch for a specific workflow? You can now swap the scans to place them back in the correct position!
The software was redesigned with the end user in mind. The layout was updated to make the scanning experience more focused and streamlined. The clearer interface creates a better user experience and optimizes workflow.
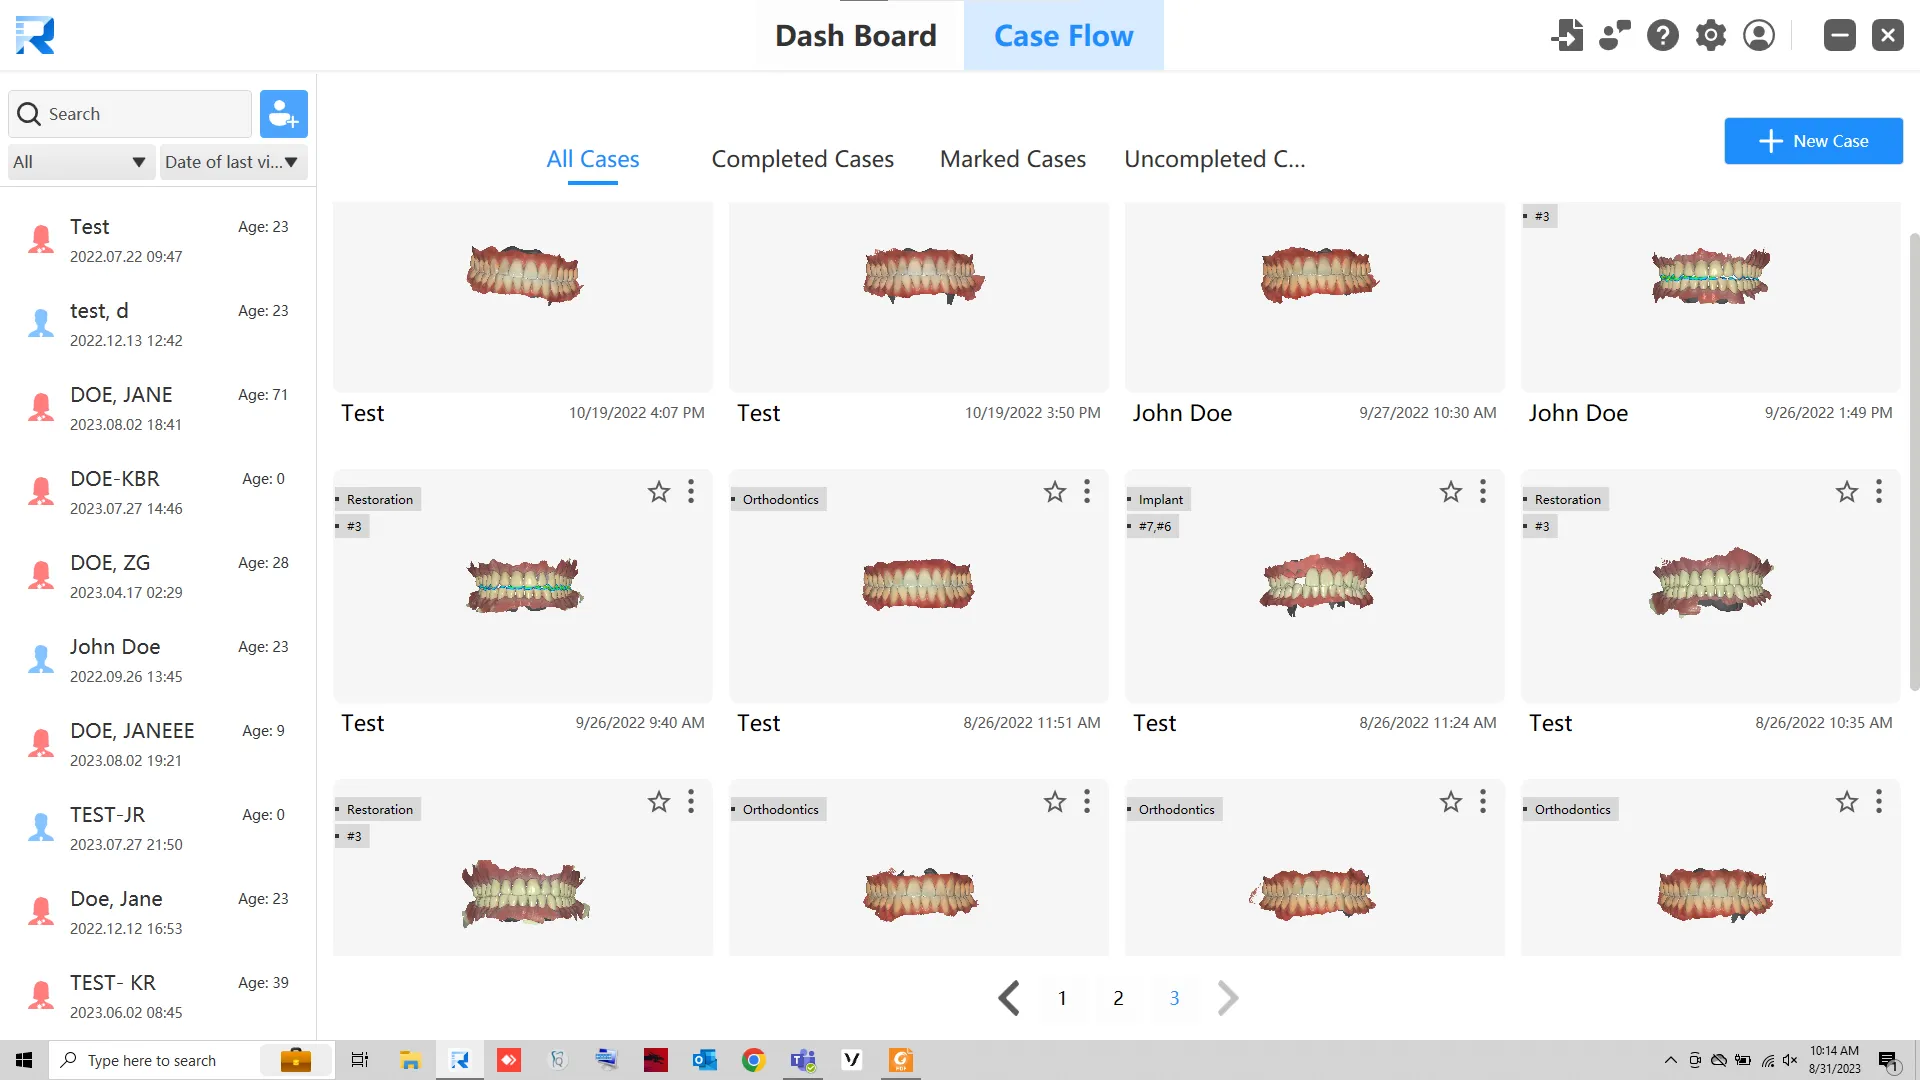
The brand-new dashboard interface now includes practical information such as scanning statistics and hard disk space availability. This gives the users a snapshot of their scanner usage.

This interface combines case management and patient management into one. Larger thumbnails and detailed information are retained on the right hand side. Patient names are found on the left side. Users can view cases and sort them accordingly.
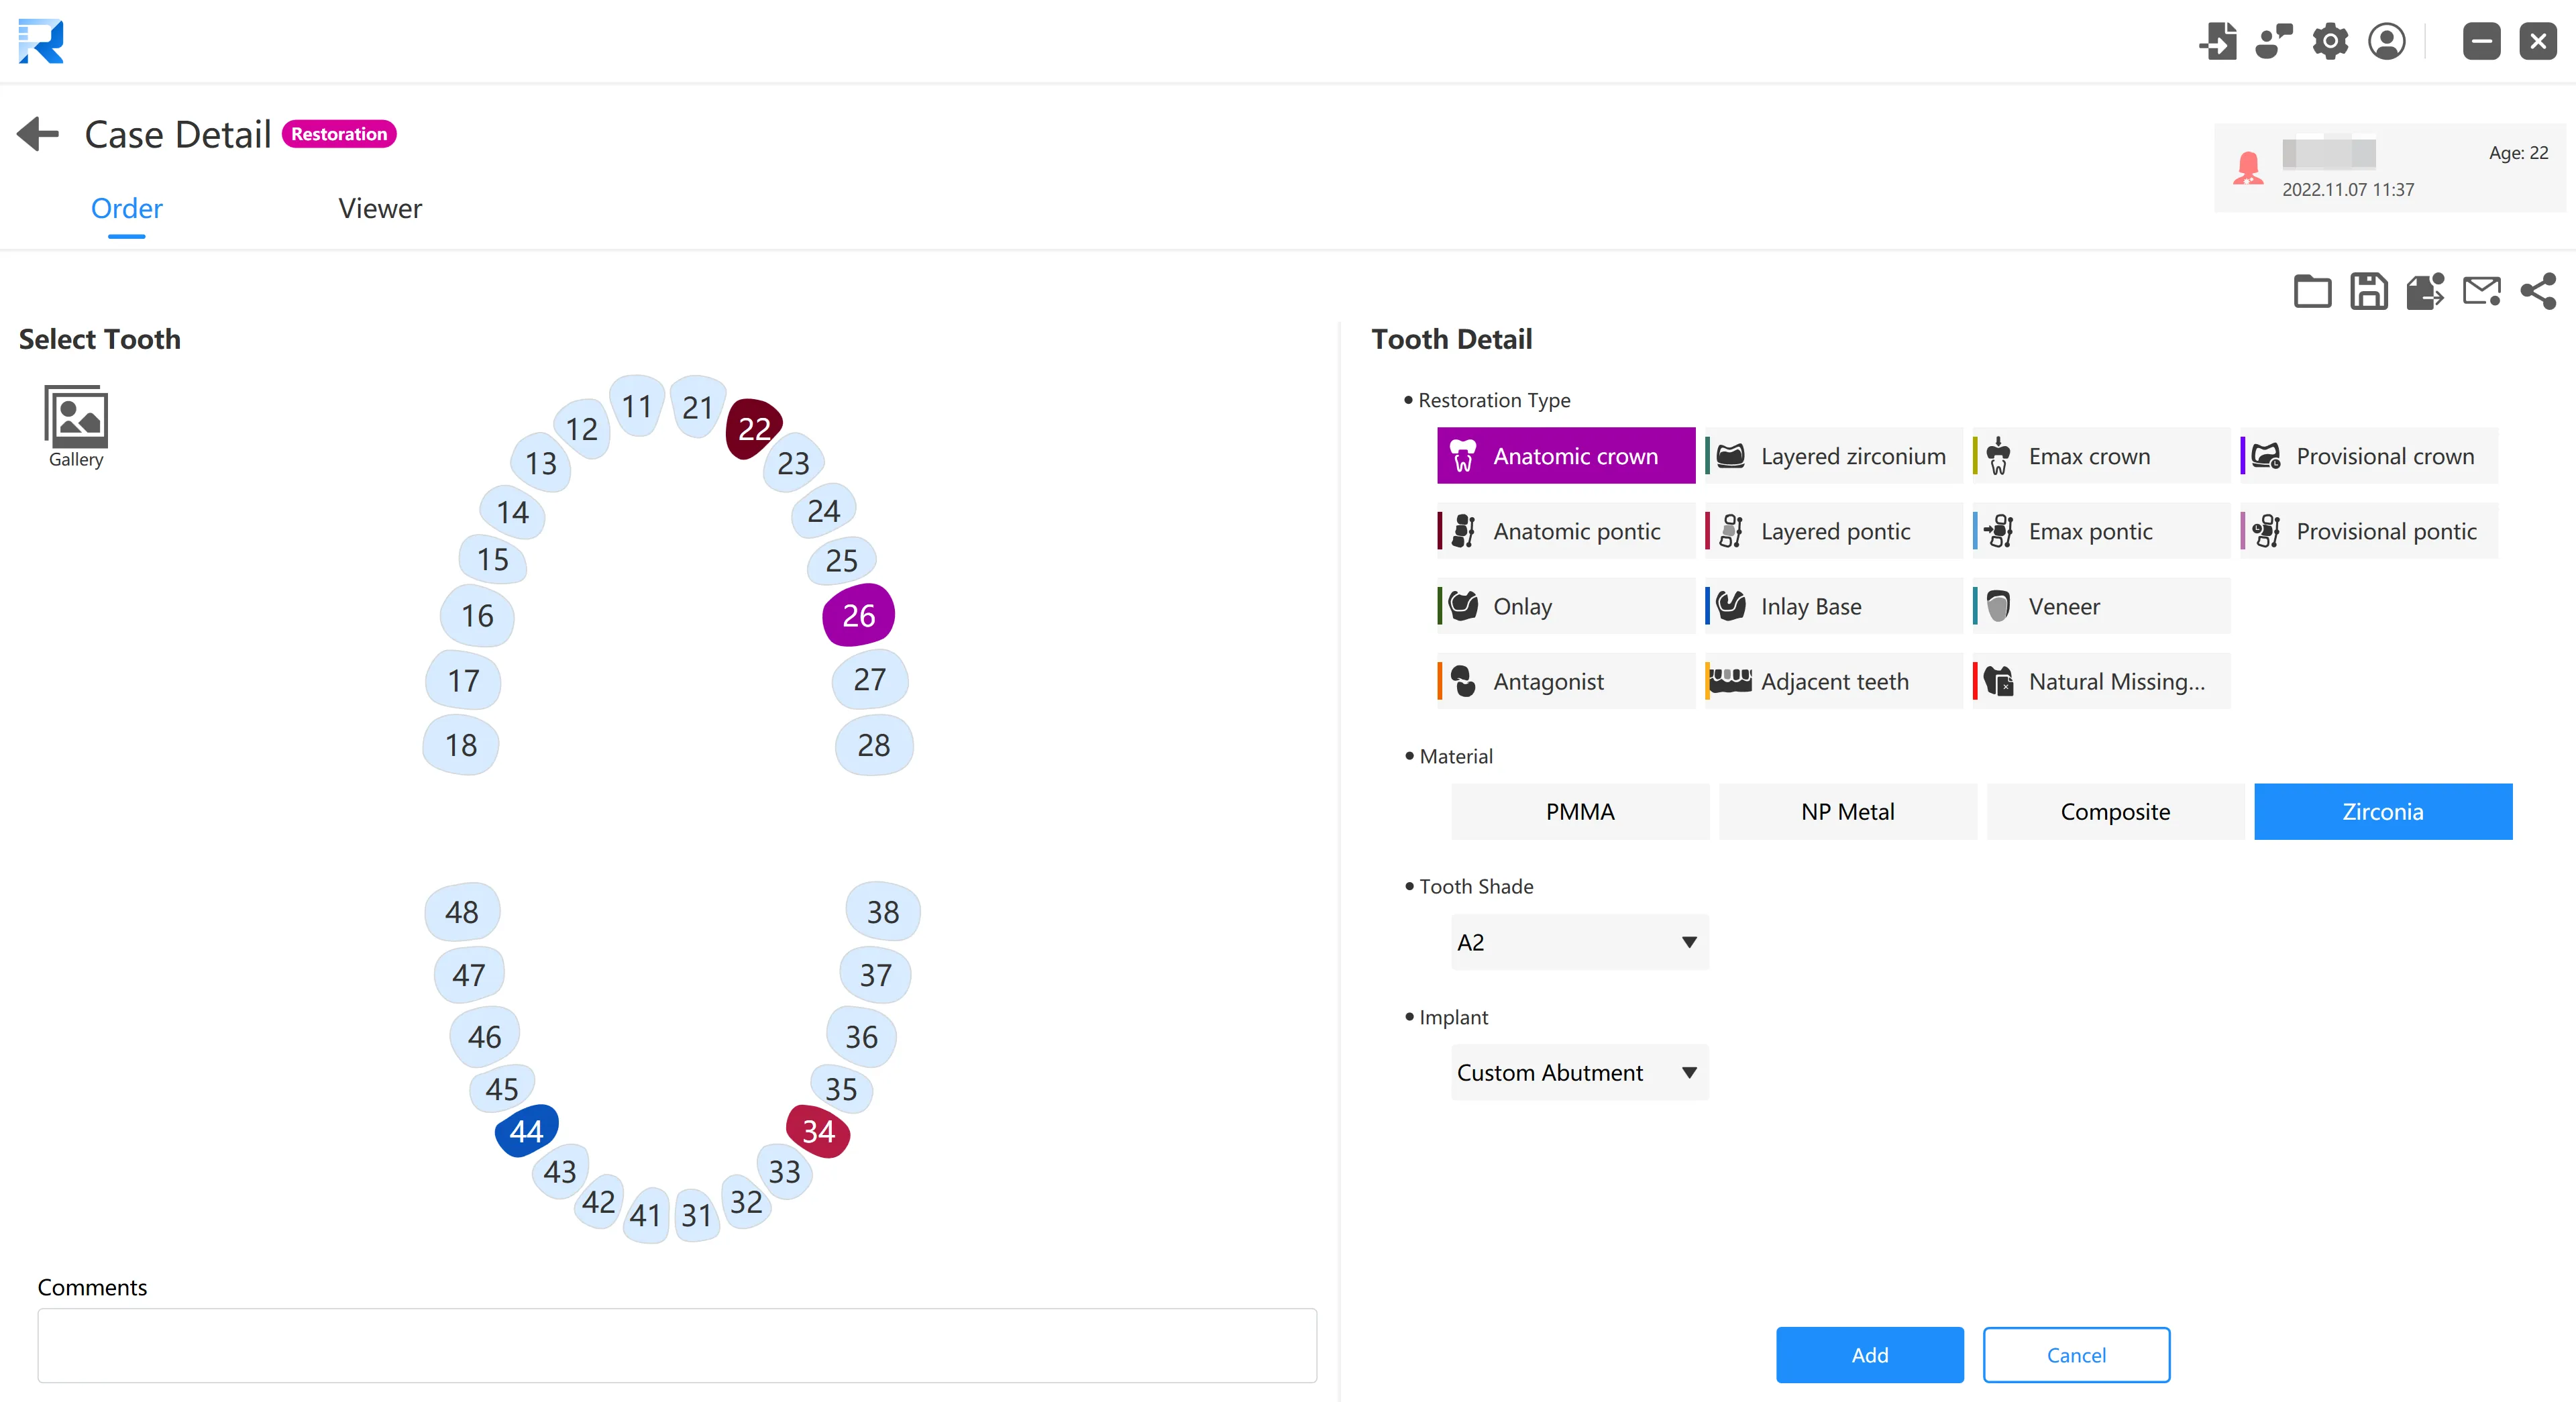
For case details, users add dental information, notes, etc. from left to right, and the added dental information will be displayed intuitively in the form of a list. Details entered here can be used as lab prescription for restorative cases.
Use the viewer to review scanned files IN 3D.

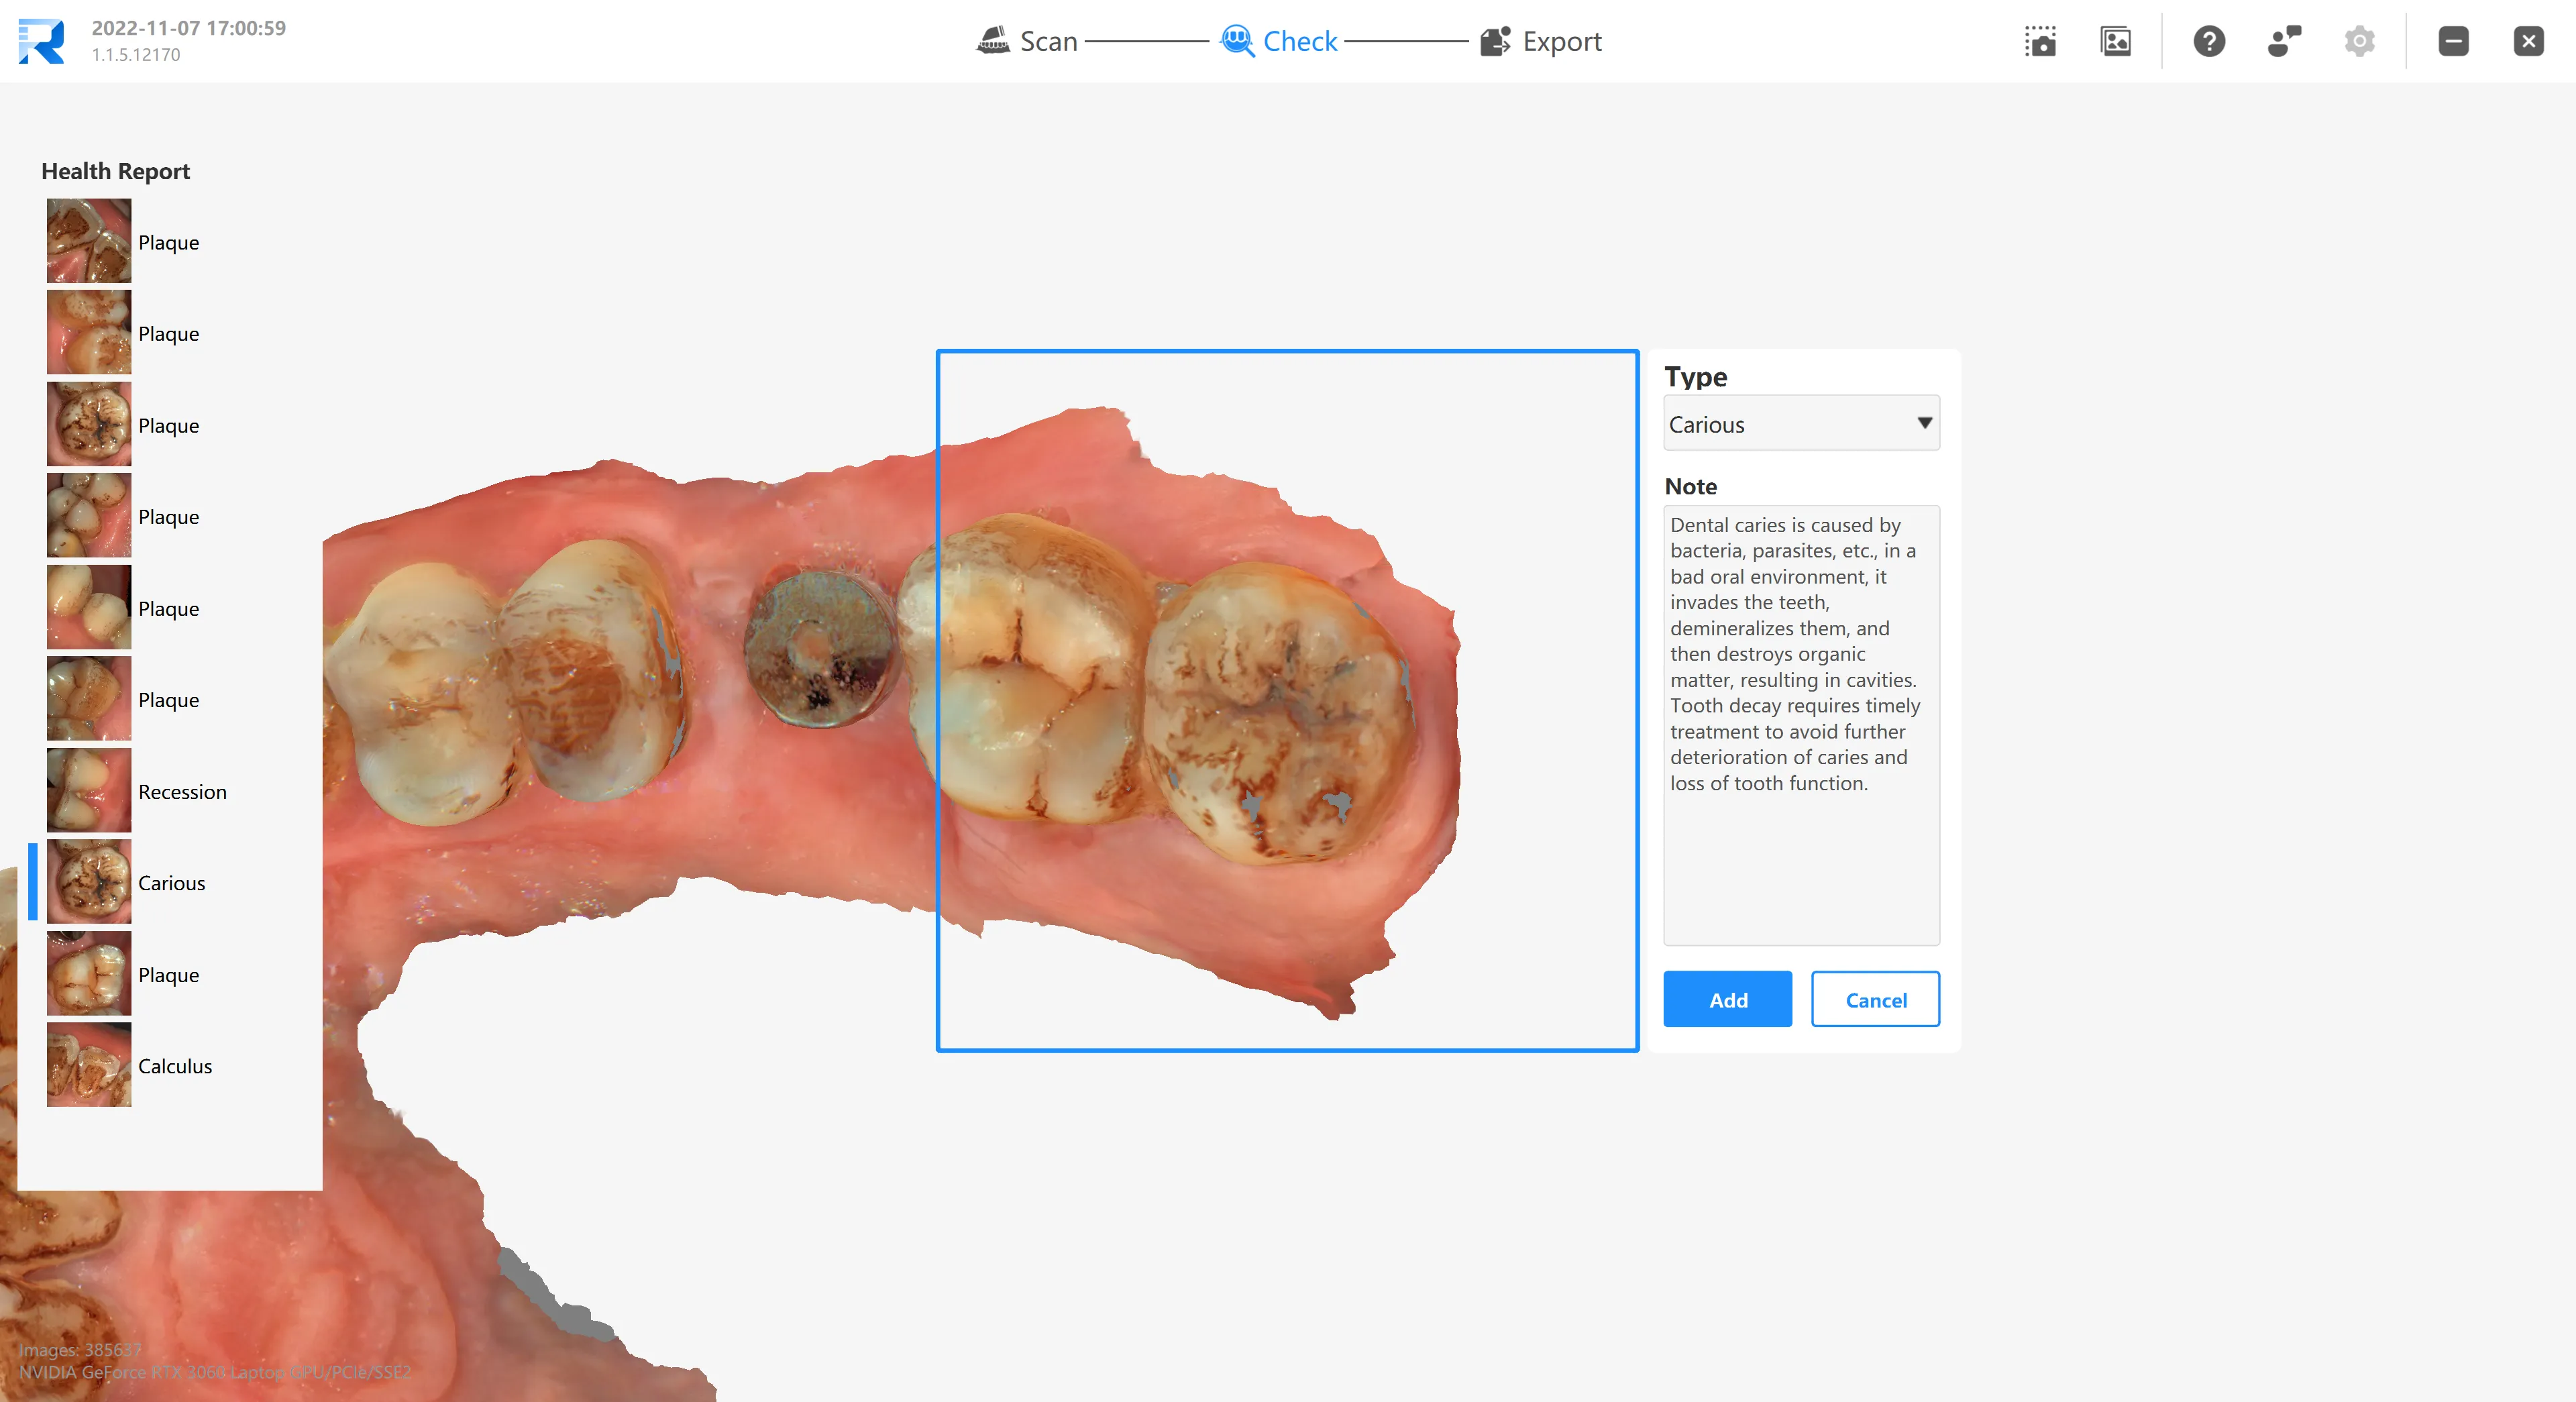
In the new version of the software, an independent health report process is added, which integrates the "smart diagnosis" function. After scanning and obtaining the complete intraoral data of the patient, the AI intelligent algorithm will accurately find the patient's lesions according to the image and 3D structure, such as dental caries, dental calculus, gingival recession, etc., and can quickly locate each lesion. It is convenient for patients to understand their oral health more quickly and intuitively.
After scanning, the AI will identify oral health conditions and list them on the left hand side. When you click on an item on the list, a screenshot window will pop up automatically, and pre-fill the symptoms of the lesion and recommended diagnosis and treatment methods, which can be modified by the doctor according to the actual situation of the patient. After confirmation, the lesion will be automatically included in the oral health report.
A file will be generated after the doctor confirms the diagnosis. The report can be uploaded to the cloud server and shared with patients in the form of a QR code for easy viewing and as a reference for follow-up diagnosis and treatment.
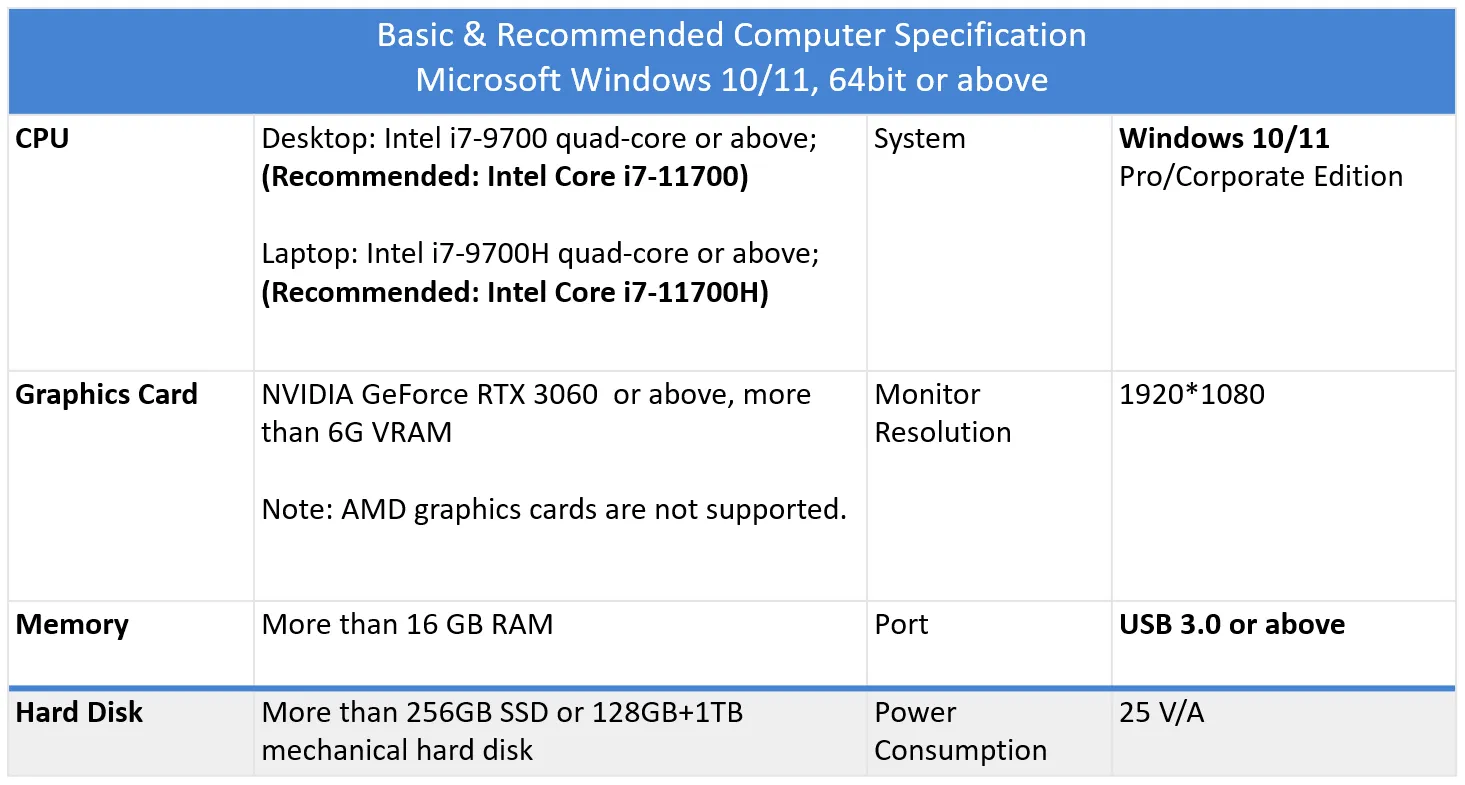
Intraoral scanners use a series of images to reconstruct the 3D view of the object being scanned. Therefore, they demand the use of high performance, dedicated graphics card. Please see the minimum/ recommended requirements before purchasing your PC or laptop.
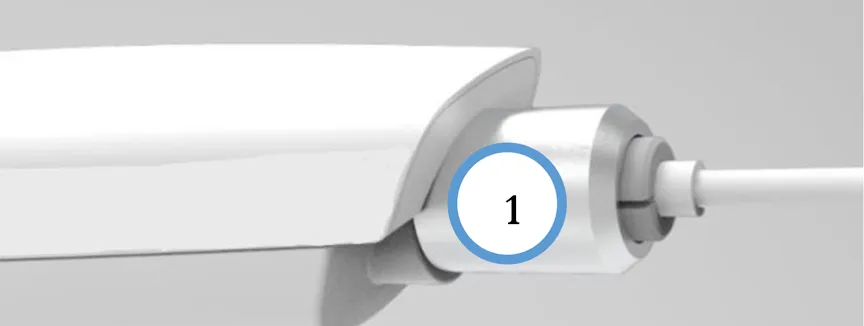
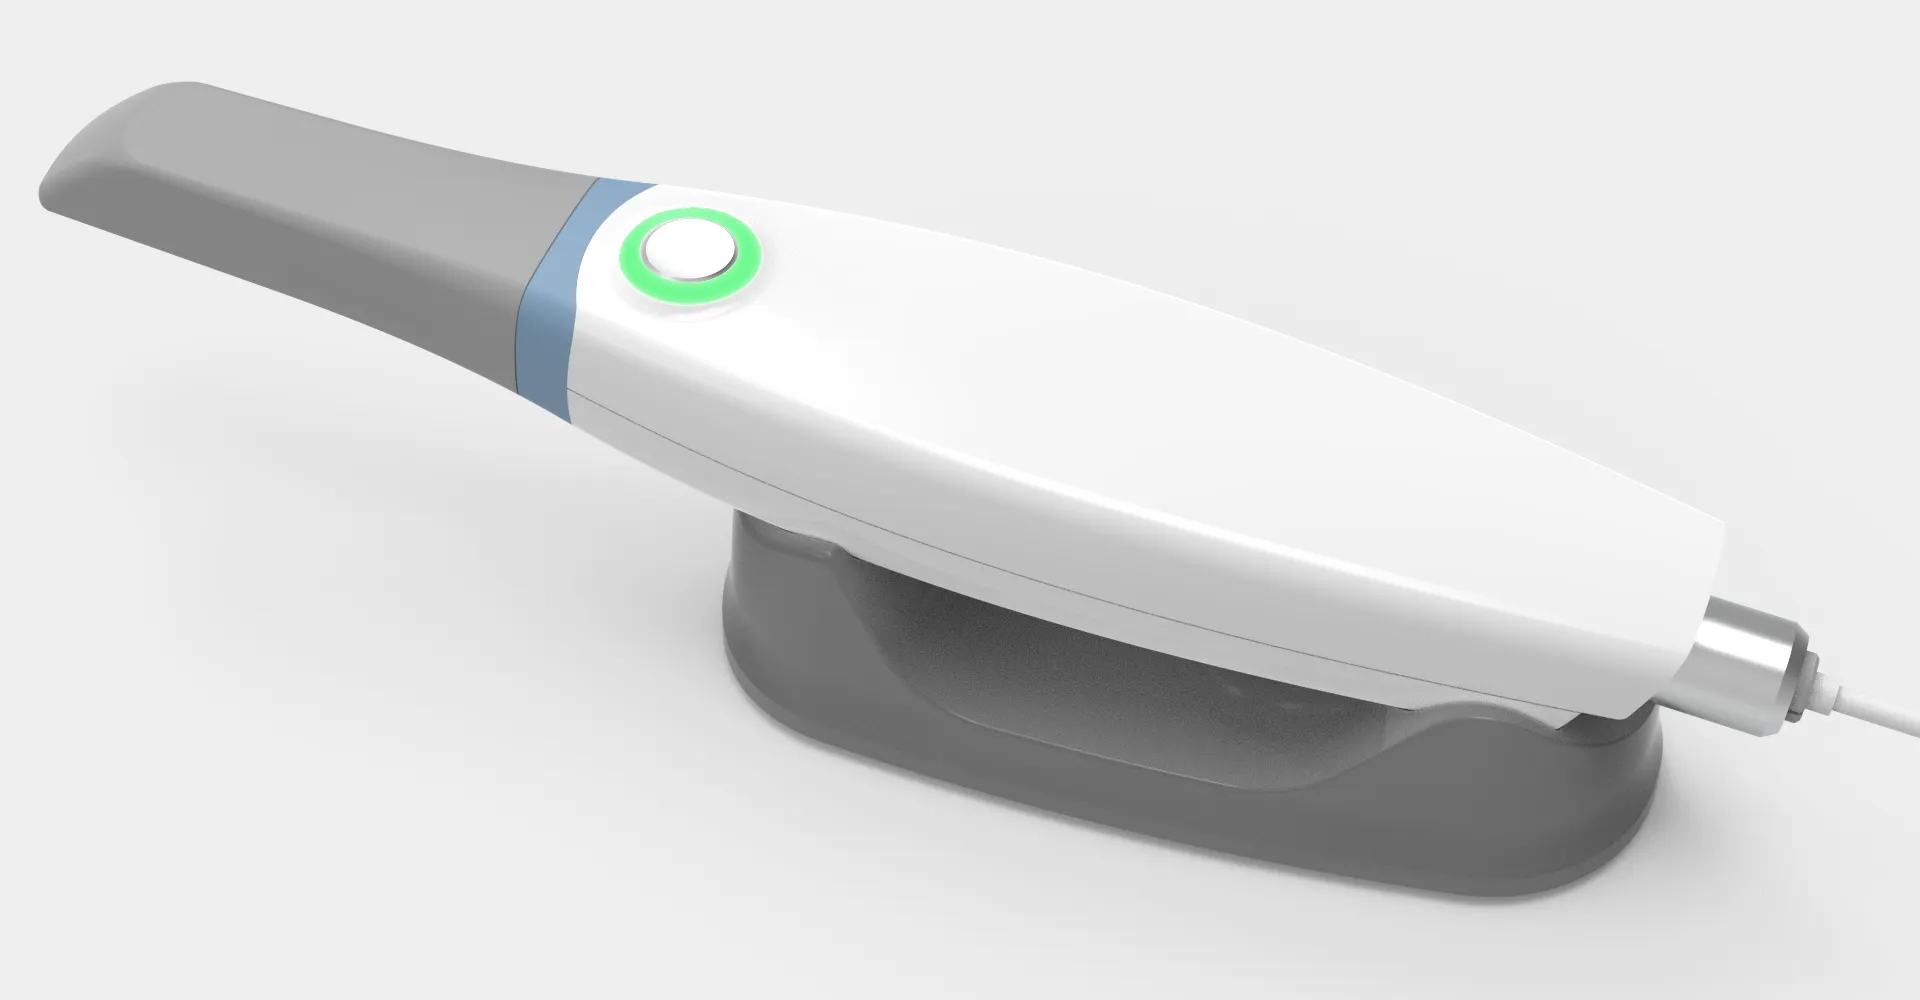
I. Connect the scanner cable to the wand: insert the wire into the Type-C interface at the end of the wand, adjust the position of the tail cap, and screw it into the thread at the end of the wand. During locking, it is necessary to prevent the tail ring from skewing and damaging the thread.
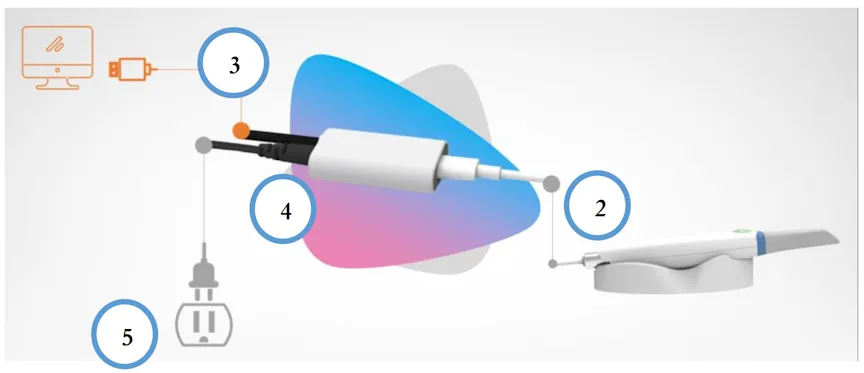
II. Connect the other end of the Type-C cable into the connection box. Please make sure the cable is inserted firmly.
III. Connect the USB cable of the connection box into the USB port of the computer.
IV. Connect the power adapter to the connection box
V. Plug the power adapter to the wall outlet.
Scanner connection status: After the scanner is powered on, the indicator light will be green; when the scanner is started and connected to the computer successfully, the indicator light will turn blue; if the connection to the computer fails, the indicator light will blink blue;
Scanning start and stop: After starting the software, creating a case and starting to enter the scanning program, pick up the scanner from the base, the scanner starts to emit light and enter the preview mode; at this time, press the button to enter the scanning mode, and the ring light switches to green display; Press the button again to exit the scanning mode and return to the preview mode; after the scanning is completed, put it into the base and enter the sleep mode.
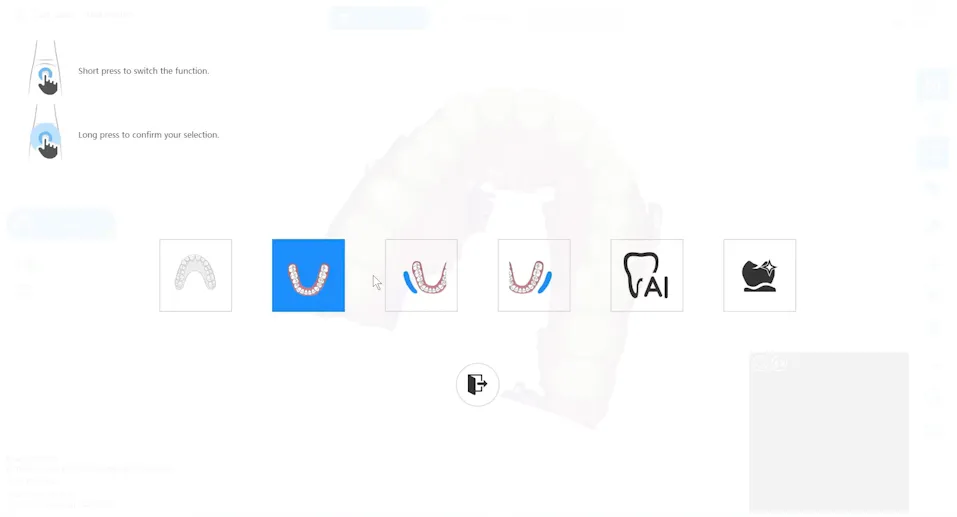
In the preview or scanning mode, press and hold the scanner button to enter the remote control mode, and you can perform functions such as step switching and mode switching.
To move from one option to the next, do short presses on the button until your desired option is highlighted. Do a long press to confirm selection.
Start the scanning process at a stable, well defined area such as the occlusal table of a molar. From there, follow the occlusal surfaces all the way to the other end of the arch. Move the tip towards the lingual and start scanning the lingual surfaces back to the other end where you began. Move the tip towards the buccal and scan towards the midline. Switch grips to scan the other buccal surfaces.
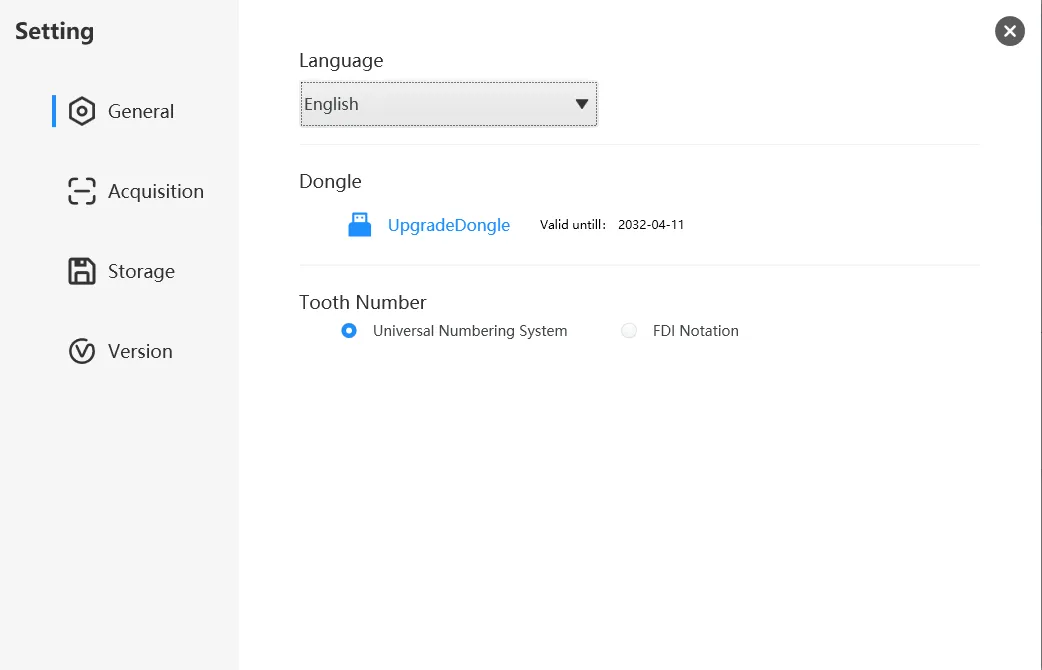
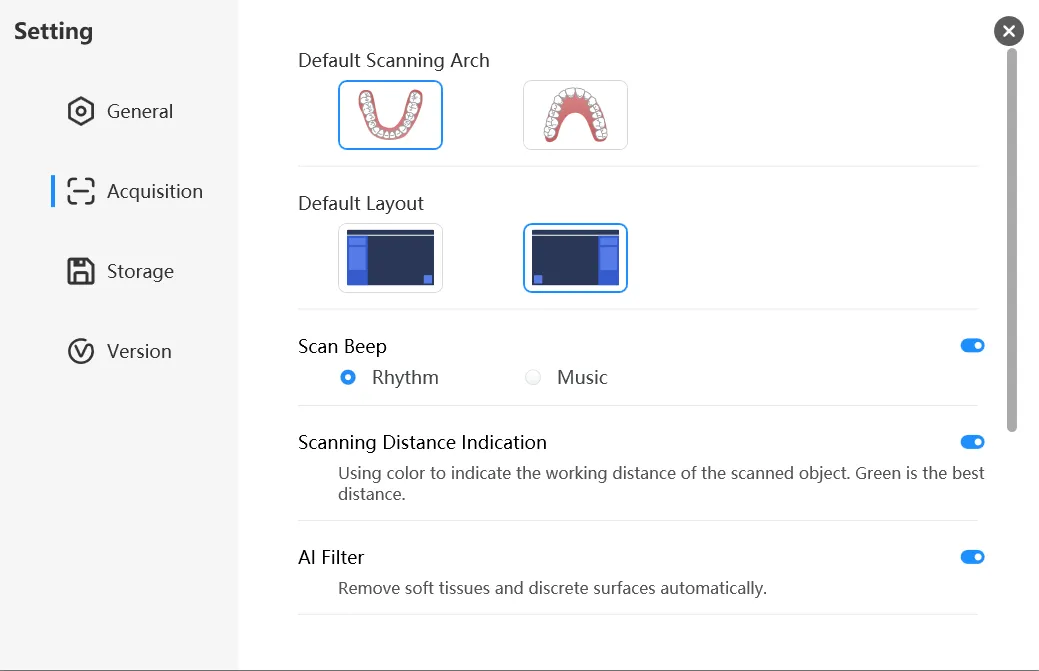
Press the gear icon on the upper right side of the screen to enter the software settings. Settings menu opens to General Settings by default.
Language settings: There are 12 different languages available to choose from- English, Simplified Chinese, French, Italian, Japanese, Russian, Spanish, Korean, Greek, Polish, Portuguese and Romanian.
Dongle: Shows validity period
Tooth Number: Select your preference between Universal Tooth Numbering System and FDI Notation
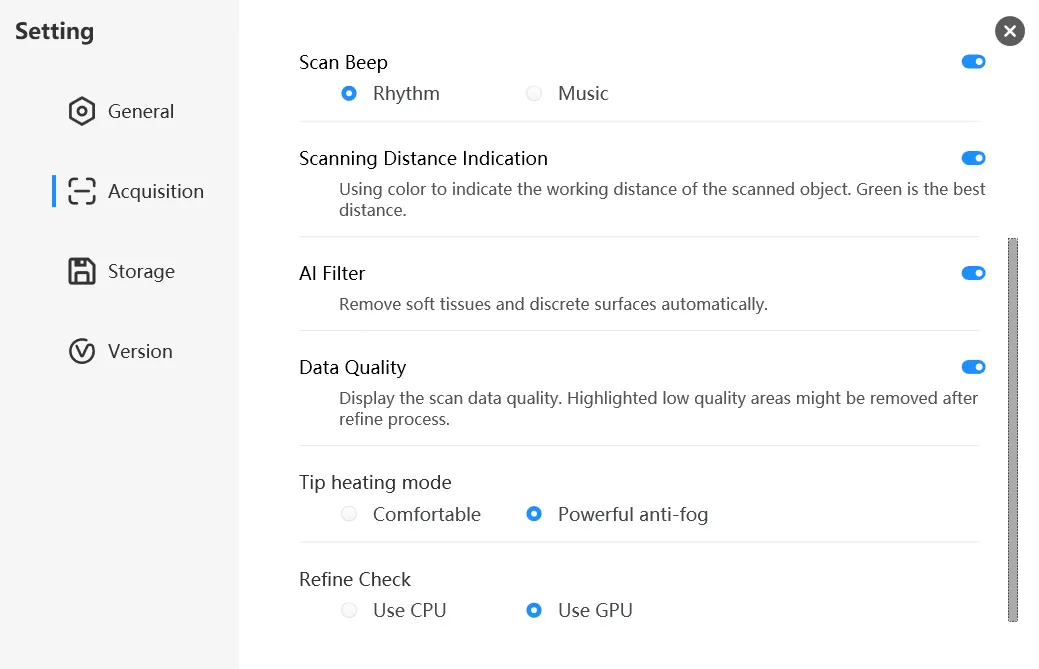
Change the Default Scanning Arch, Layout and Scan Beep according to your preferences. Keep the other settings as is. They are set for maximum scanner performance.
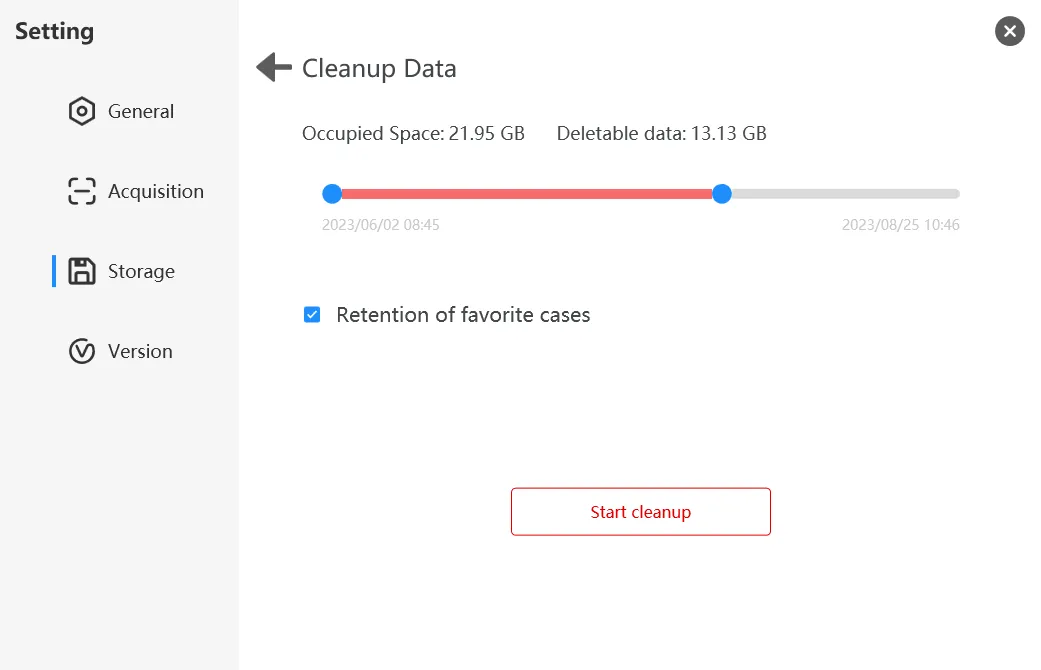
The storage data is divided into scanning result files and intermediate temporary data files.
Scanning result files- these are scanned files that are deemed final and ready for export. In the storage settings, you can set the save path of the exported data.
Intermediate temporary data files- allows the cases to be reopened in the software for viewing and scanning. Keeping too many temporary files may reduce the system disk space and even affect normal scanning. Please set a reasonable time limit for temporary file storage according to the situation.
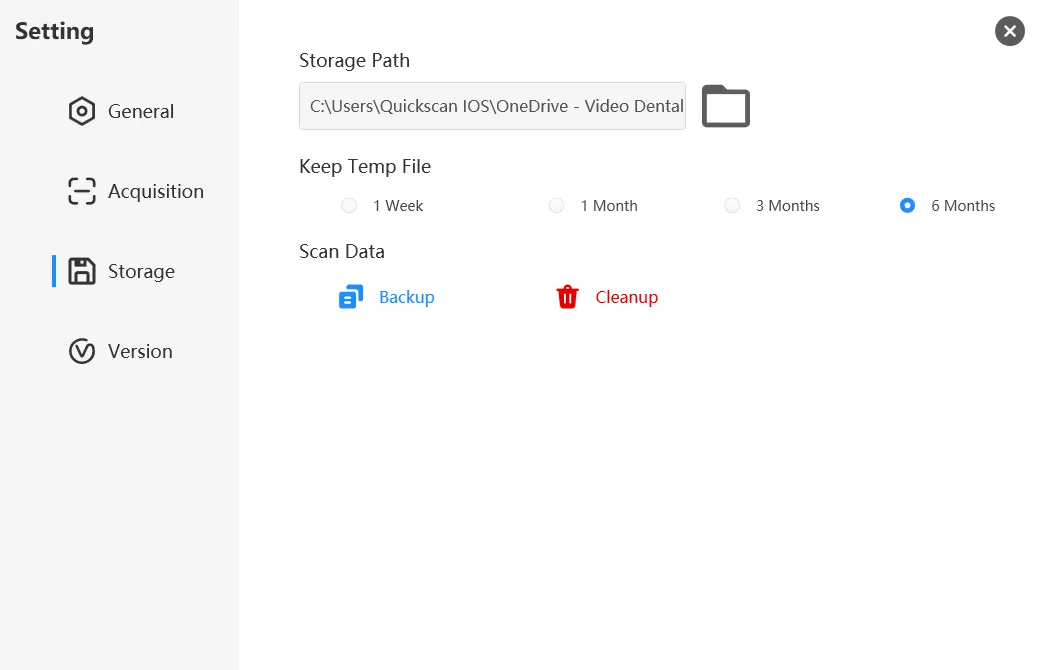
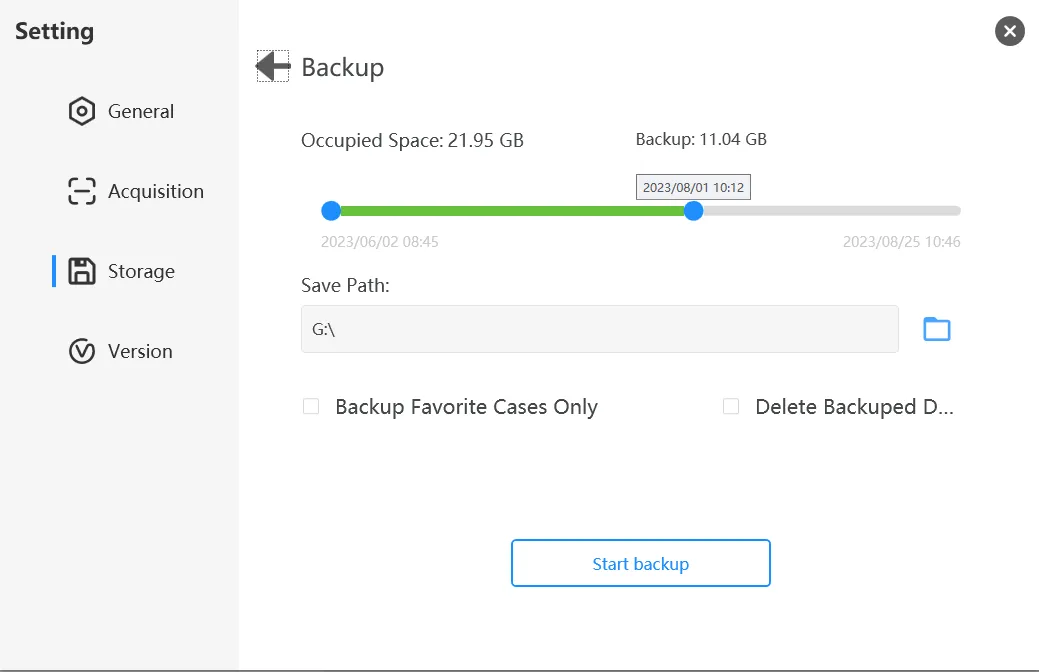
The scanned cases can be backed up to other folders locally or preferably to external hard drives. The backup function not only backs up the scanning result files, but also retains intermediate temporary files, which can be re-imported to the scanning software to open or re-scan.
Cases can be selected in batches for backup according to the timeline, or only favorite cases can be backed up.
Cases can be deleted in batches. Only the intermediate temporary files of the cases will be deleted. The exported data are safe and will not be deleted in this process.
A deleted case cannot be re-opened in the scanner software.
Lets users know the current software version they are using. Check with your dealer for any available updates.

The health report is a new function of the new version of the software, and the scanning process is also for the upper jaw, lower jaw and occlusion. The difference is that during the optimization process, the AI intelligent algorithm will automatically identify the lesion area from the image and the 3D shape of the tooth, and it can be quickly added to the health report after confirmation by the doctor, which is convenient for users to view.
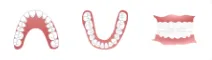
This is one of the most commonly used workflow which requires scanning the patient's upper and lower jaws and occlusal data separately. In restoration mode, partial scanning or full-mouth scanning can be performed according to the condition of the tooth to be restored. Margin marking and undercut functions can be accessed through this workflow.
This workflow adds another step for the scanning of implant scan bodies. The obtained data will be sent to the laboratory at the same time to accurately locate the depth and direction of the implant.

The orthodontic process needs to scan the full mouth data of the patient. In order to meet the data requirements of different orthodontic manufacturers, in addition to the tooth data, part of the gingiva data and adjacent data must be scanned completely. Occlusal scans are performed on the left and right cheeks to obtain a more accurate occlusal relationship.
Use this workflow for scanning for mouth guards, retainers, etc.
By turning on the AI smart scan, soft tissue, tongue and other objects on the scan are automatically filtered and removed. By default, AI scan is turned on. See difference below when AI is turned off and on.

This function is useful to lock a well scanned area to prevent subsequent addition of images. Best use scenario- After scanning the preps or scan body, lock the area so scanning the rest of the arch will not affect what was locked.
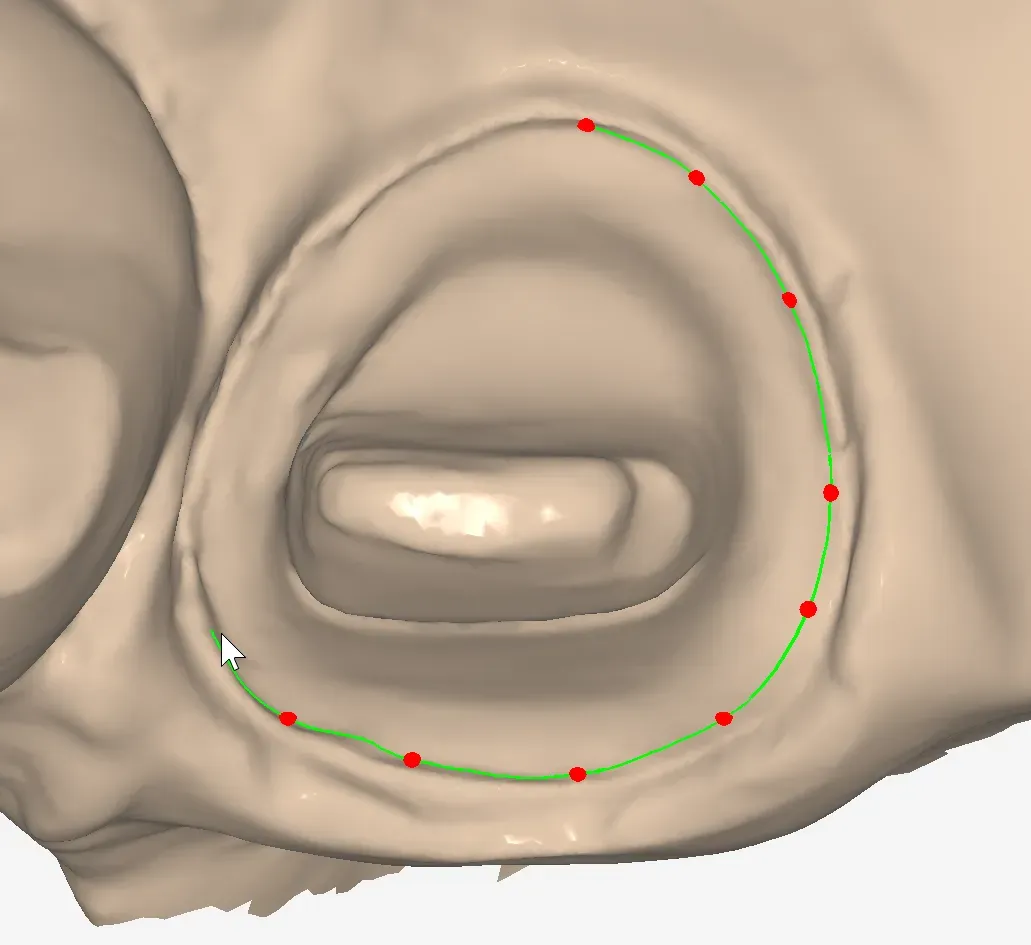
When using the Restorative workflow, Doctors are able to mark the margins of the prep prior to sending the file to the lab.
Click the "Margin Line" button. Use the left click mouse button to mark the margin line. Use CTRL+Z to undo. Double click at the end point to complete the margin. To modify some areas, move the red control points to the desired position. Click "OK" to save the margin.
This function is used to check whether there is an undercut in the preparation area prior to sending the case to the lab.
Adjust the viewing angle of the tooth prep at the direction of the path of insertion. Click "Calculate"
Use the colored scale on the right side to determine amount of undercut shown on the prep.
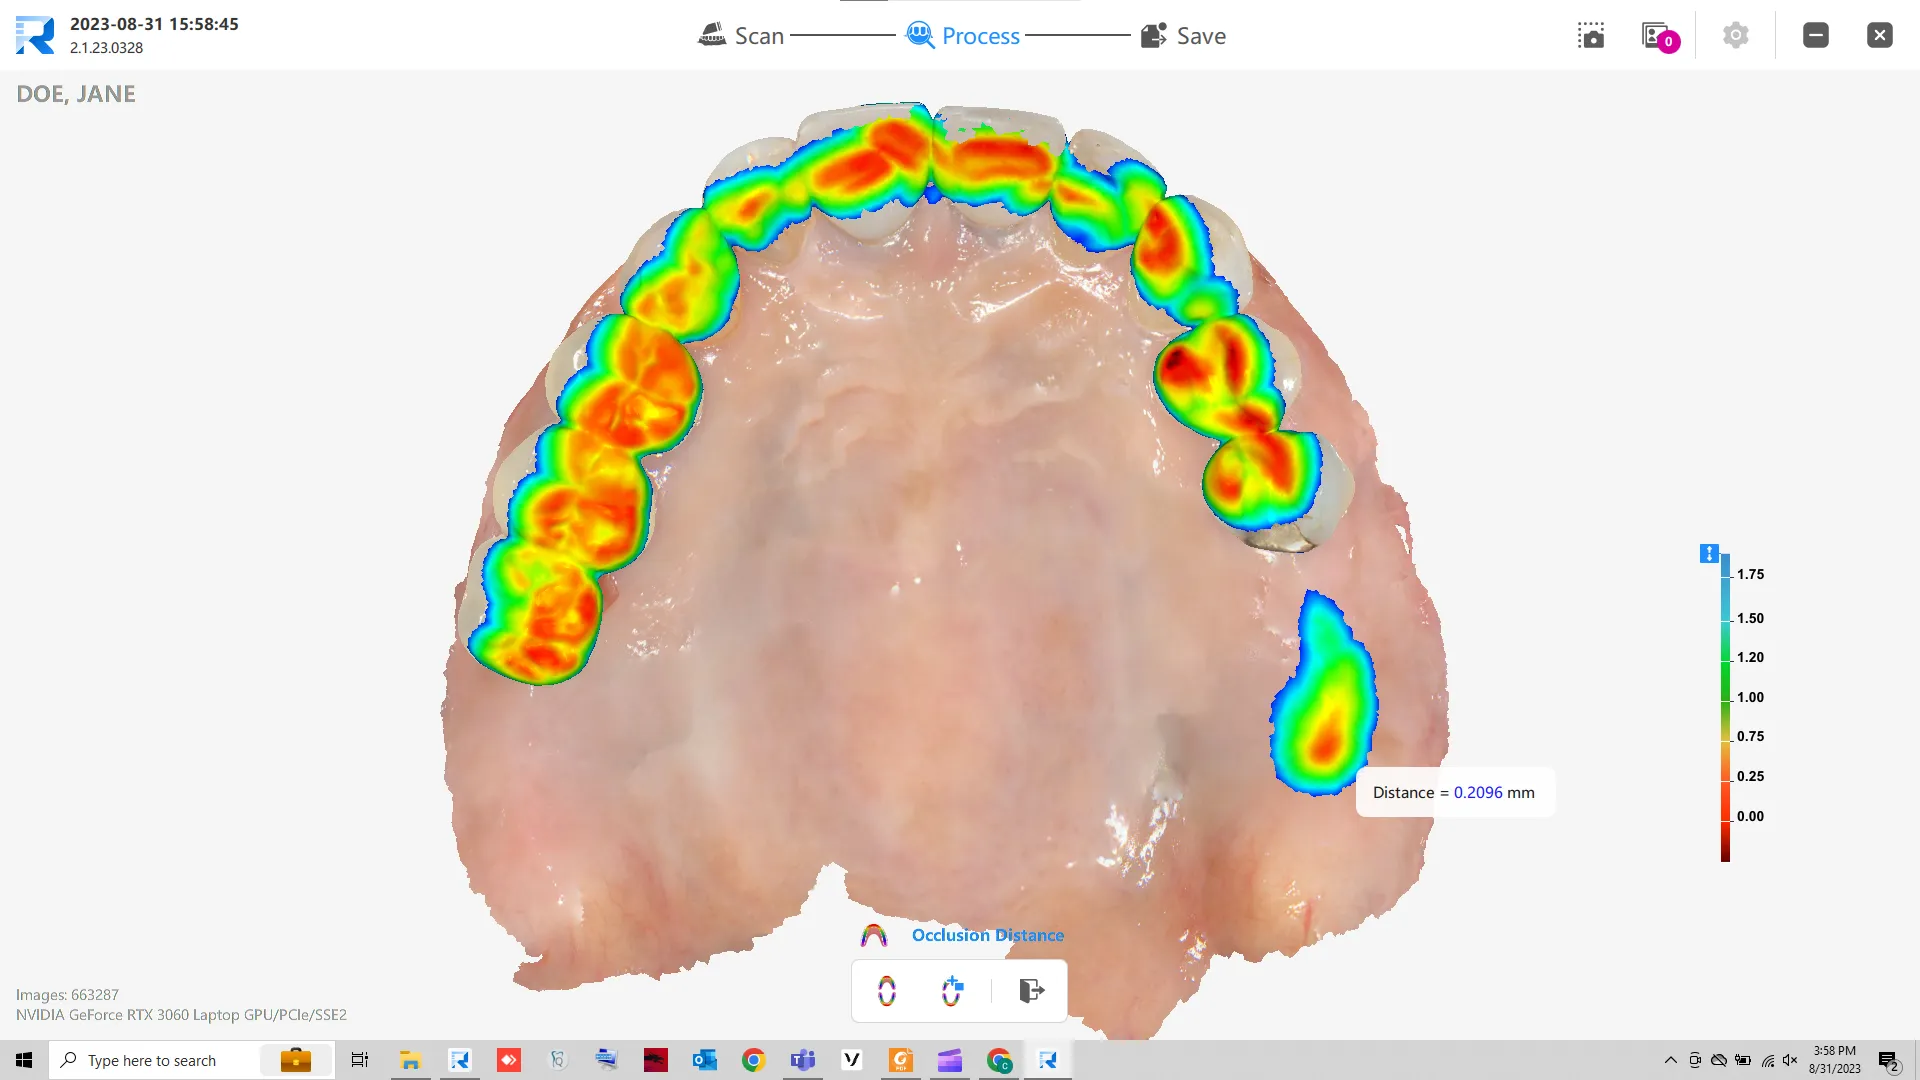
Occlusal distance tool can be used in different scenarios-
1. to check preps if there is enough occlusal clearance to the opposing dentition
2. to show patients where their bite force is concentrated.
When scanning, missed areas will be marked green after processing. Click "Lock Scan View" to hold the scanning view in one position. The operator can then focus on scanning that area until all voids are filled.
Follow the video on how to set up your Gmail account to work with the software
Follow the step by step procedure on how to set up your online account in the QuickScan IOS portal.
Immerse the scanner tip in CIDEX OPA solution (0.55% ophthalaldehyde) for more than 5 minutes. After completion, dry the scan tip and the lens with a soft cloth (non woven fabric) and a dust free cotton swab, and use it immediately to avoid secondary pollution of the scanner tip.
It is required to check whether the scanner tip and the lens are in good condition before starting use.
Note: During immersion disinfection, the scanner tip needs to be placed vertically in the disinfectant solution, and it must be dried after being taken out.
Note: The scanner tip needs to be sterilized or disinfected after every use.
Sterilization may be completed by the procedures described below. Failure to observe these procedures may pose a risk to patient and/or the device.
Step 1: Separate the scanning tip and the scanner handpiece, first clean the scanning tip and the lens with clean water (running water) and alcohol (75% concentration of medical alcohol), pay attention to remove the dirt, oil stains, spots and other traces on the lens. And dry the scanning tip and lens with a soft cloth (non woven fabric) and a clean cotton swab, and handle well with drying.
TIP: Compressed air cans could be used to blast water off the tip, preventing streaks, watermarks, and dust from being placed or left on the mirror after cleaning.
Step 2: Put the tip into a sterilizing bag, which should be completely sealed. Use self-adhesive tape or heat sealing bags.
Step 3: Use one of the following two programs to sterilize the wrapped scanner tip. (High Pressure Sterilizer)
· Sterilize for 3.5 minutes at 134C
· Sterilize for 15 minutes at 121C
Service Life: It is recommended that each scanner tip should not be sterilized more than 100 times. Reason: When the sterilizer is working, the high temperature and high pressure inside will cause damage to the lens of the scanner tip. This will greatly affect the accuracy of the later scanned data.
When you are having scanner "disconnected" issues, please check the following areas:
The scanner is connected to the computer through the USB port. Connection problems usually occur in the following places:
1. End of the Scanner wand
2. Scanner cable and connection box interface
3. Connection box and computer USB interface
4. The scanner cable itself
Follow these steps to troubleshoot the problem:
1. Check the connection stability between the black wire of the connection box and the computer/USB Hub.
2. Check whether the Type-C cable and the connection box are plugged to the end
3. Check whether there is obvious shaking of the wire and whether the connection is affected after the threaded lock catch at the tail of the handle is locked
4. Check the Type-C cable itself to see if there are damages, twists and knots in places on the outer skin, and check whether the cable affects the connection;
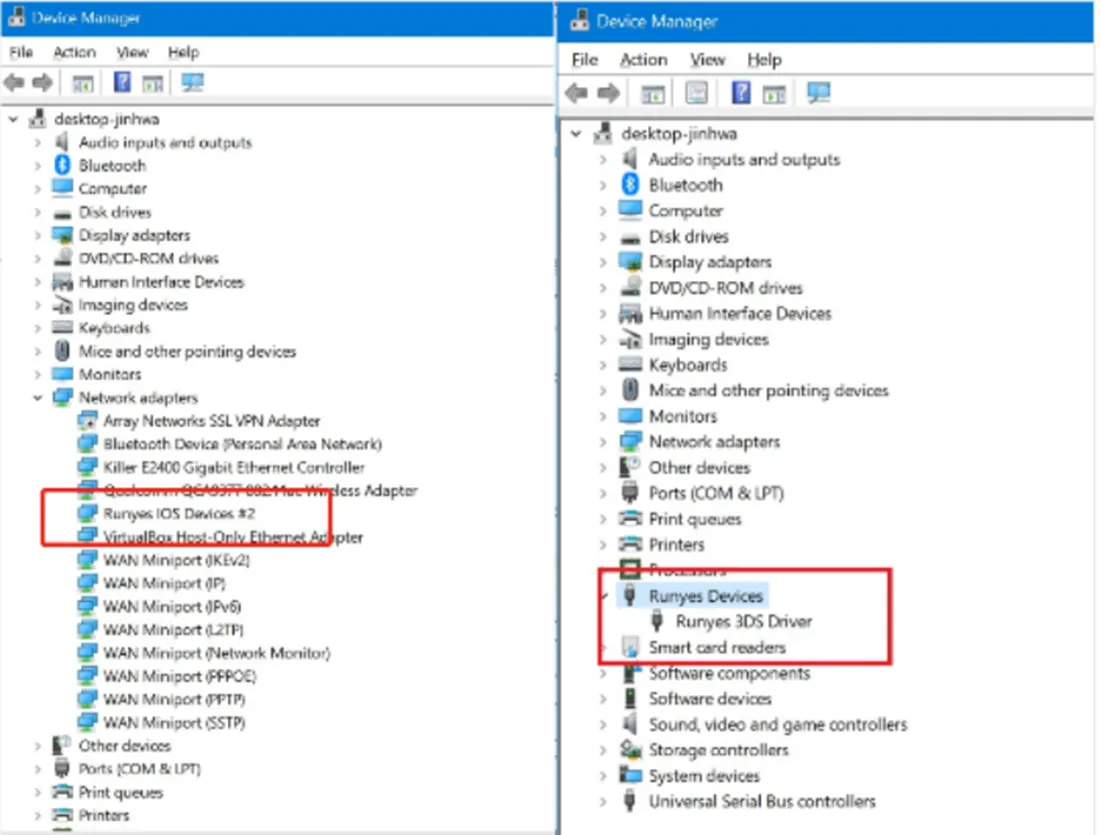
1. Open the Windows Device Manager.
2. Look for "Network Adapters" and click the dropdown arrow.
3. Check if "Runyes IOS Devices" is listed.
If you do not see this in the list, you might have a cable connection issue. Please contact customer service for more assistance.
If you purchased the scanner before 2023, please follow these steps:
1. Open the Windows Device Manager.
2. Look for "Runyes Devices"
3. Click the dropdown and check if "Runyes 3DS Driver" is listed
If you do not see this in the list, you might have a cable connection issue. Please contact customer service for more assistance.
When you turn on the scanner at room temp, it usually takes a minute or less for the "Tip is warming up. Please wait." window to disappear. If it takes several minutes for the reminder to disappear, try using a different tip. If the problem stays after changing tips, please check the following areas:
If there is fogging in the video window, go to software settings->acquisition->tip heating mode->powerful anti-fog.
If there is still fog in the window during intraoral scanning in the powerful anti-fog mode, or heating prompts appear frequently on the software interface during scanning, please check the hardware related to heating.
Heat from the scanner to the mirror tip occurs at different areas:
1. Heat conduction inside the handpiece for heating
2. Conduction at the handpiece heating shrapnel
3. Heating guide on the back of the scanner tip (used to conduct heat to the top of the scanner tip)
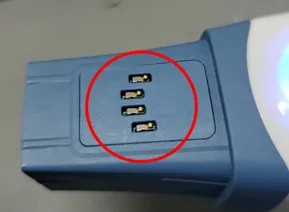
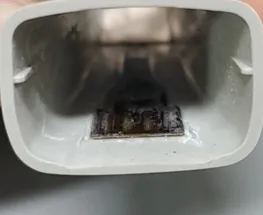
When the heating is abnormal, there may be several reasons:
1. The internal heating of the handpiece is short-circuited.
2. The heating shrapnel (encircled in red) is damaged. (Please do visual inspection to check for any abnormal appearance.)
3. The heating guide of the scanner tip is damaged (Please check for corrosions.)
If problem still persists after software and hardware checks, please contact customer support.
In the implant scanning process, the common problem is that the data of the scan body is incomplete, or the scan body is incorrectly matched, which may cause the processing lab to fail to perform accurate pairing after receiving the data. In order to solve this problem, the new version of the software adds the "Smart Scan Body Matching Function", which not only ensures the accuracy of the scan body, but also saves scanning time and avoids repeated scanning.
Click "Mark Scan Body", use the marking tool to locate the position of the scan body, and delete part of the gingival data on the edge of the implant to avoid affecting the scan body data.
Click the "import reference data" button before scanning. Select the scan body stl file that corresponds to the current scan body of your case, and then start scanning.
Start scanning from the area near the scan body. While scanning, the software will automatically match with the reference data of the scanning rod. After the matching accuracy requirements are met, the reference scanning data will automatically appear at the marked position and be highlighted in blue. At this point, you can stop scanning and observe whether the position of the reference scanning rod is consistent with the actual position in the mouth.
Watch the video to see the entire Implant Workflow, including Smart Scan Body Matching function.
TUTORIAL VIDEOS